本帖最后由 机器谱 于 2023-5-22 10:57 编辑
1. 功能说明
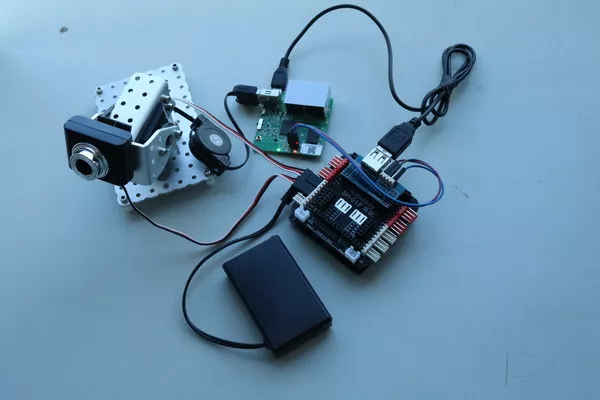
在R207样机舵机云台上安装一个摄像头,本文示例将实现舵机云台追踪球形物体的功能。
2. 电子硬件
在这个示例中,我们采用了以下硬件,请大家参考:
主控板 | Basra主控板(兼容Arduino Uno)
| 扩展板 | Bigfish2.1扩展板
| 电池 | 7.4V锂电池 | 通信 | 2510通信转接板
| WiFi路由器 | 其它 | 摄像头 | 配置OpenCV的Visual Studio 2015.net环境 的计算机一台 |
电路连接说明:
① 将2510通信转接板连接到Bigfish扩展板的扩展坞上面;
② 用3根母对母杜邦线将2510通信转接板与WiFi路由器连接起来:GND-GND、RX-RX、TX-TX;
③ 找到1根USB线,一端连接到2510通信转接板接口上,另一端连接到WiFi路由器USB接口上;
④ 将摄像头线连接到WiFi路由器接口上。
3. 功能实现
实现思路:实现舵机云台追踪蓝色小球。
3.1 工作原理
① 摄像头采集图像信息;
② 通过WiFi将图像信息传递给PC端(VS2015配置的OpenCV环境);
③ 在PC端使用OpenCV对图像转化为灰度图像;
④ 检测圆形,并且计算出圆中心坐标;
⑤ 采用九宫格方式对摄像显示图像进行分割;
⑥ 确定目标物体在显示图像的所处九宫格位置;
⑦ 如果目标图像超出九宫格位置的中心,调整摄像头矫正偏移使目标物体在屏幕中心位置;
⑧ 调整摄像头需要上位机通过WiFi给下位机发送矫正指令,下位机需要接收信号,并且让安装了摄像头的舵机云台做出相应的矫正动作。
3.2 示例程序
编程环境:Arduino 1.8.19
① 下位机例程
将参考例程(example.ino)下载到主控板,开启路由器,将路由器与主控板TX、Rx串口进行连接,同时将PC连接至路由器WIFI网络。下位机接收上位机处理的图像信息结果控制舵机云台相应运动,云台跟随目标物体运动。
② 上位机例程
下面提供一个可以实现舵机云台追踪球形物体的参考例程(MainWindow.xaml.cs),大家可参考演示视频完成该实验。
- using System;
- using System.Collections.Generic;
- using System.Linq;
- using System.Text;
- using System.Threading.Tasks;
- using System.Windows;
- using System.Windows.Controls;
- using System.Windows.Data;
- using System.Windows.Documents;
- using System.Windows.Input;
- using System.Windows.Media;
- using System.Windows.Media.Imaging;
- using System.Windows.Navigation;
- using System.Windows.Shapes;
- using System.Windows.Forms;
- using System.Runtime.InteropServices;
- using System.Threading;
- using System.Net;
- using System.Net.Sockets;
- namespace Project
- {
- /// <summary>
- /// 形状跟踪,球
- /// </summary>
- public partial class MainWindow : Window
- {
- //导入 HoughCircles.dll 动态链接库
- [DllImport("HoughCircles_DLL")]
- public static extern void HoughCircles([MarshalAs(UnmanagedType.LPStr)]string ip_address, //视频地址
- ref int xpos, //跟踪物体中心X坐标
- ref int ypos); //跟踪物体中心Y坐标
- //定义窗口大小
- int cap_w = 320, cap_h = 240;
- //跟踪物体中心 x, y 坐标值,物体轮廓半径r
- int x = 0, y = 0;
- //定义命令变量
- string CMD_UP = "", CMD_DOWN = "", CMD_TURN_LEFT = "", CMD_TURN_RIGHT = "";
- //结构体
- public struct Boundaries
- {
- public int x_left;
- public int x_right;
- public int y_up;
- public int y_down;
- }
- Boundaries boundaries = new Boundaries();
- public MainWindow()
- {
- InitializeComponent();
- }
- private void Window_Loaded(object sender, RoutedEventArgs e)
- {
- GetIni();
- SetPosition();
- CmdInit();
- StructInit();
- }
- //变量初始化
- private void CmdInit()
- {
- CMD_UP = "U";
- CMD_DOWN = "D";
- CMD_TURN_LEFT = "L";
- CMD_TURN_RIGHT = "R";
- }
- //结构体初始化
- private void StructInit()
- {
- boundaries.x_left = 100;
- boundaries.x_right = 200;
- boundaries.y_up = 80;
- boundaries.y_down = 160;
- }
- //获取ini配置文件信息
- private void GetIni()
- {
- ini_RW.FileName = System.Windows.Forms.Application.StartupPath + "\\Config.ini";
- this.videoAddress.Text = ini_RW.ReadIni("VideoUrl", "videourl", "");
- this.ipAddress.Text = ini_RW.ReadIni("ControlUrl", "controlUrl", "");
- this.portBox.Text = ini_RW.ReadIni("ControlPort", "controlPort", "");
- }
- //修改配置
- private void setBtn_Click(object sender, RoutedEventArgs e)
- {
- ini_RW.WriteIni("VideoUrl", "videourl", this.videoAddress.Text);
- ini_RW.WriteIni("ControlUrl", "controlUrl", this.ipAddress.Text);
- ini_RW.WriteIni("ControlPort", "controlPort", this.portBox.Text);
- System.Windows.MessageBox.Show("配置成功!请重启程序以使配置生效。", "配置信息", MessageBoxButton.OK, MessageBoxImage.Information);
- //this.Close();
- }
- //命令发送函数
- void SendData(string data)
- {
- try
- {
- IPAddress ips = IPAddress.Parse(ipAddress.Text.ToString());//("192.168.8.1");
- IPEndPoint ipe = new IPEndPoint(ips, Convert.ToInt32(portBox.Text.ToString()));//把ip和端口转化为IPEndPoint实例
- Socket c = new Socket(AddressFamily.InterNetwork, SocketType.Stream, ProtocolType.Tcp);//创建一个Socket
- c.Connect(ipe);//连接到服务器
- byte[] bs = Encoding.ASCII.GetBytes(data);
- c.Send(bs, bs.Length, 0);//发送测试信息
- c.Close();
- }
- catch (Exception e)
- {
- System.Windows.Forms.MessageBox.Show(e.Message);
- }
- }
- //跟踪物体位置界限判断
- private void LineDetect(int _x, int _y)
- {
- if (_x > 0 && _x <= boundaries.x_left)
- {
- SendData(CMD_TURN_LEFT);
- }
- else if (x > boundaries.x_right && x < cap_w)
- {
- SendData(CMD_TURN_RIGHT);
- }
- else if (_y > 0 && _y <= boundaries.y_up)
- {
- SendData(CMD_DOWN);
- }
- else if (_y > boundaries.y_down && _y < cap_h)
- {
- SendData(CMD_UP);
- }
- }
- //物体位置初始化#FFACAAAA
- private void SetPosition()
- {
- var color = new SolidColorBrush((System.Windows.Media.Color)System.Windows.Media.ColorConverter.ConvertFromString("#00008B"));
- objEllipse.Height = 30;
- objEllipse.Width = 30;
- objEllipse.Fill = color;
- var left_distance = (cap_w - objEllipse.Width) / 2;
- var top_distance = (cap_h - objEllipse.Height) / 2;
- Canvas.SetLeft(objEllipse, left_distance);
- Canvas.SetTop(objEllipse, top_distance);
- }
- //跟踪物体位置更新函数
- private void PositionUpdate(int x, int y)
- {
- LineDetect(x, y);
- Canvas.SetLeft(objEllipse, x);
- Canvas.SetTop(objEllipse, y);
- posLable.Content = x + " , " + y;
- }
- //线程函数
- private void ThreadCapShow()
- {
- try
- {
- while (true)
- {
- this.Dispatcher.Invoke(
- new Action(
- delegate
- {
- string ip = this.videoAddress.Text;
- HoughCircles(ip, ref x, ref y);
- PositionUpdate(x - 15, y - 15);
- }
- ));
- }
- }
- catch { };
- }
- //打开跟踪窗口
- private void openBtn_Click(object sender, RoutedEventArgs e)
- {
- try
- {
- Thread m_thread = new Thread(ThreadCapShow);
- m_thread.IsBackground = true;
- m_thread.Start();
- }
- catch { };
- }
- }
- }
4. 资料下载
资料内容:
①追踪球形目标-例程源代码
②追踪球形目标-样机3D文件
资料下载地址:https://www.robotway.com/h-col-126.html
想了解更多机器人开源项目资料请关注 机器谱网站 https://www.robotway.com
|


 发表于 2023-5-22 10:57:41